So, it's almost fall, and although I don't want to let go of this amazing warm summer weather, I have realized that I need to embrace it! I have found an adorable jar craft (because who doesn't love jars??!?!?) that is super easy and pretty cheap.
You will need:
-Faux fall leaves (with the whole entire plastic stem removed)
-small clear glass jar (as many as you like)
-hot glue
-colored twine (brown or hay colored)
-something to fill the jars with (mini pinecones, candy, scented beads, anything that gives off a fall vibe)
-scissors
Once you have removed the hard plastic from the leaves (it should just peel off), cut the leaf so that it will fit onto the jar. Glue it on, with the flat, cut part on the bottom, make sure there are no parts sticking up!
Depending on the size of your jar, glue the leaves on bordering the bottom bit of the jar, I used about three. Next, take the twine and wrap it around the middle of the jar about three or four times, and tie it off into a bow. If you don't know how to tie a bow, look it up, because I also have no idea (how uncrafty of me!).
Now that you've made your adorable jar, you can fill it with something! You can find mini pinecones that smell like cinnamon, or little scent beads, or cinnamon candy, or even candy corn. Anything FALLy, really.
xx
Savannah
So this might be one of my absolute favorite canvas projects. It's super easy and really cute, a great project for children or the artistically challenged, like me! First you will need: -a blank white canvas -any color(s) of finger paint, just be careful of mixing because -painter's tape (whichever width you want, although I'd recommend the thinner standard one)
Next, pick a word that means something to you or that is special, you could do "Love," or "Faith" or "Hope," just keep it short, and I would do all uppercase letters. Take the painter's tape and stick it onto the canvas to form your word of choice, don't be afraid to mess around with how the letters look, and remember, they don't need to be perfectly straight. Just get creative with it!
Here comes the fun part! This is the bit that you can let a little kid do! Just take the finger paint and spread it evenly all over the canvas. Make sure to leave finger swipes in it, it should end up looking something like this.
Then, wait for the paint to dry and peel the tape off! Voila! You have a beautiful piece of inspiring and fun art that you can hang anywhere you want, and you can be proud that you finally made something and it turned out well!
Ok, we all know that no matter how much we say "I love organizing things!" that we actually mean "I love when people think I'm an organized person who has their sh!t together." So, I have scoured the internet in an attempt to pull together some of the best organizing tips and tricks from some of the most elite organization gurus!Please enjoy this bulletted list of stuff you'll love me for when you're done reading: Cords: We all hate cords, you turn your back to them for one second and you turn back around to see that they've gone from a perfect bundle to a giant sailor's knot. Take inventory of them, lay them all out on the floor and tame them with some twist ties or cable ties. You can slip them into the cardboard middles of finished toilet paper rolls, then into a box, or put dividers in a cardboard box and set each cord in its own spot. Be sure to label every cord! To make your project look pretty, paste decorative paper onto the box and rolls!Bathroom: I know I'm not the only one who has the messiest countertop ever in my bathroom. I never took advantage of all the space I never even knew I had! Make use of your medicine cabinet by storing every day products in it, always put them back! If you have a lot of hair products and tools, get a clear plastic bin for them and put it under the sink, be sure to tame the cords on the tools! Use towel hooks for each member of the family or roomie, you could even find fun letter things to put above the hooks to personalize it! Get an expandable cosmetic drawer organizer (or consult my makeup organization post here:) for all of your makeup and put it in a drawer, those things are awesome, but unfortunately I do not have drawers, as for some reason my vanity is really short! Take advantage of over the toilet space! You can find some really nice over toilet cabinets at pretty good prices at places like Lowes. I got these apothecary jars at the Container Store and they're literally amazing and I put my cotton swabs and cotton balls in them and it just looks so cute!Office Space: First off, hide your cords, they're a mess and they're distracting (and not very pretty!). Use mason jars for your writing utensil storage! Take five and lie three on their sides with the opening facing you, make sure they're touching. Then stack two more in the cracks like a flat top pyramid, if you need more space, add a sixth jar to the top! But don't fill the jars more than a third, otherwise things get crazy! If you have one really big drawer in your desk, get a drawer divider, they're life savers. Install open shelving for books! I personally prefer vertical shelving that doesn't have sides, but do as you please. Also, get paper organizers. They're really cute and not too expensive and they are really helpful. (Find some here.)Ok so these were the spaces of mine and my friends' that I found to be most unorganized, if you want any tips on another space that wasn't included, drop me a comment, I'd love to help you!
 Hello! So a while back I mentioned my meeting with an interior designer, and we just met up again I think two days ago, so now I've spent the past two days working on my room! I've mostly been sitting down on the floor in the middle of my room in my little workspace piddling around the internet looking for stuff to use, but I call that work. I don't think there will be much DIY involved in this, but I do have some cool ideas that I'm going to incorporate into the room. *Story time* SOO, a long time ago I didn't have a bathroom to myself that I could apply makeup and do hair in, so I had a hand towel on my dresser and set my makeup on that. One day I went to change the towel, and as I pulled it off, it ripped some of the paint off the dresser, leaving some wonderful pink and orange towel fuzz behind! Well, the decorator had an idea that I think is absolutely brilliant. We are going to dismount the mirror from the top of the dresser and sell it, and then take printed out black and white or color photos, and scatter them to completely cover the top of the dresser. Then we're going to get a piece of glass that fits the dresser top and put it over the photos! The damage will be covered, and it'll look amazing! Also, we're going to do a frame wall and hang some lanterns in the corner over the dog crates. And I'm finally getting a desk! For a while my only desk has been a small (yet adorable) table and chairs, so we're selling the chairs and painting the black table green to add a pop of color to the room! I have yet to find an orange task light to put atop my new desk, but when I do it will be mine *evil laugh*
Okay thanks for reading this super long bit that should probably go under ramblings but I count it as a project so whatever.
xx
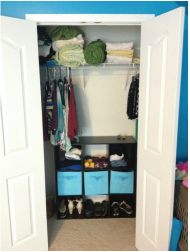 Okay so we all know that closets are a huge pain the butt, and mine was a total MESS, but this is the new look of it. I used to have a table and chairs a few feet in front of it because all the closet contained was junk, and the cubby in it was perpendicular to it, to the left. I had liked that setup for a little bit, but it just had to change. The closet was just a wasted space, so I emptied it out completely, and filled bags upon bags up with donations and trash, and I took everything off the cubby too. I put the cubby in my closet and hung my shirts and folded my sweaters. I folded old quilts and sleeping bags and towels and put them up in the "rafters." I hung my short clothes next to and above the cubbies, leaving a small section next to it (hidden by the door) to put empty hangers so they wouldn't get lost, as well as shirts I'd already worn that week to prevent repeats (I'm awful at remembering and I do that sometimes). To the right of the cubby I hung dresses and skirts. My workout and physical therapy stuff are in the cubby. The drawers, from left to right, go electronic accessories (cords, batteries and packaging), survival (flashlight, candle, food bars, dog treats, water bottle, medicine, and first aid), and finally notebooks that aren't full yet. I like keeping notebooks with me just incase I need to write something down. And no, the notebook app on my iPhone will not do. I can't remember things if I don't hand write them. I guess I'm just an old schooler.
 Okay, so a lot of us with older houses have sinks like this. This was taken of the sink in my aunt's house in Kentucky, yes, I'm in Kentucky again. These sinks are annoying to deal with, you always have your hands smashed up against the back of the sink and it's just hard to use. So, I found a solution that is creative and easy, as well as cheap and good for the environment!
Basically, you take a large baby shampoo bottle and use a knife to cut a hole in the bottom that is just large enough to fit around your sink faucet, and then cut the top and about an inch under it off the bottle. After that cut a U shape in one side, and fit it around the sink. This is great for kids, and can be painted and decorated to be more attractive!
Thanks for reading! xx
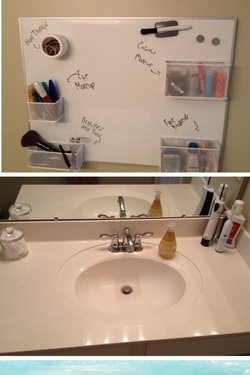 I am just so excited about my new bathroom! No, I didn't actually move or get a new bathroom, but I did have a trip to the Container Store that had me almost drooling over all of the organization things! Sorry my handwriting on the board is so awful, but basically what I did was get a magnetic whiteboard and some containers for it, you can go crazy with colors, they have a whole rainbow, but my stupid bathroom is all nude colors and I did not want to paint or find a new shower curtain, so I stuck with white. Then I sorted all of my makeup and tools into piles and such and put them in the containers. I did have to do some picking and choosing with the makeup because, since the container's magnets are only so strong, they couldn't hold some things. For my counter, the only things I left out were my teeth things, soap, and a cool cotton tool holder from the Container Store because I think it looks like something from an old fashioned doctor's room and I love it. I also organized under the counter, which was a disaster area, but it's all fixed up and nice now. I know this isn't really a DIY but I HAD to share it! Thanks for reading, and I hope you can get organized too! HGTV and one really chill employee and the Container Store were my inspirations for this setup. Leave a comment and I'll be sure to respond! xx
So, I was just surfing through the FDA website, like any normal teenage girl does on a Thursday night, and I came across something that spooked me quite a bit. I did some more research and found a cool, easy, and crafty DIY solution! Now I'm excited because there's a crafty way to prevent brain damage!What I found is that the FDA (Food and Drug Administration, for those of you non-Americans) ran a test on several popular brands of lipstick, and found that 400 brands of lipstick, out of however many they tested, contained lead! For anyone who doesn't know, lead is a very harmful toxin. Just a small amount in children can cause nervous system and kidney damage, learning disabilities, ADD, decreased intelligence, speech, language, and behavioral problems, poor muscle coordination, seizures unconsciousness, and death. High levels in adults can cause issues with pregnancy fetal development, infertility (for both genders), high blood pressure, nerve disorders, memory and concentration problems, and muscle and joint pain. I could continue rattling off scary things I just learned, or I could give you a link to the site and tell you to click at your own risk, but if you do use lipstick, I recommend you click the following link and check to see if your lipstick is on it.http://www.fda.gov/Cosmetics/ProductandIngredientSafety/ProductInformation/ucm137224.htm#expanalyses | Now that you're done with the freaky part, we can get started with the fun DIY bit of this post! You can make your own lipstick out of crayons! Now isn't that nifty? What you'll need is a double boiler, or a pot with a bowl on top, a half teaspoon of Castor oil, a half teaspoon of shea butter, and crayons. If you want your creation to smell nice, 2 or 3 drops of FOOD GRADE essential oil. If it isn't food grade, do not use it. So, what you need to do is put the castor oil, Shea butter, and essential oil into the top portion of the double boiler. Then, add a half of your crayon, make sure you unwrap it. You can use a color wheel to help you mix crayons to get fun colors. But if you mix, make sure that all of the colors combined are equal to about half of a crayon. Put the crayon into the top portion of the double boiler. Make sure the stove is on medium high, and that you are stirring constantly so the ingredients mix evenly. Once your concoction is melted, remove the top bit of the double boiler and spoon the mixture into a small container. An old lipstick tube works fine. Put it in the fridge for about ten minutes. To clean your bowl, do not pour the wax down the drain. Wait until it cools a little so you won't get burnt, then wipe it up with a paper towel and discard of the towel. If you do try this, comment on this post telling me how your lipstick turned out, and what color crayons you used. I would love to hear how it worked! xx |
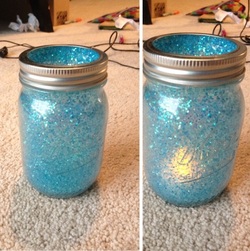 So I actually saw these on Youtube, on macbarbie07's channel, and I decided to share them with you! These, which look better at night, are the cutest little things! So, what you do, is take a Mason jar, and spray some spray adhesive all over the inside, then, you take any color of glitter and dump some in. Be generous with the glitter because you can always reclaim it, and too little will look bad, and there's no redos with this! After you put the glitter in, pop the lid on and shake the jar so the glitter coats the jar evenly. Then take some battery operated tea lights, which can be found at any craft store, turn them on, and put them in the jar! Then, to make the jar look nicer, put the twisty bit of the lid on it. The other bit will be covered in glue and glitter, so you can toss it in the garbage bin if you please. Also, for more personalized jars, you can take some sticker paper and cut it into a shape or letter and put it on the side of the jar before you do the spray glue, and remove it once the glitter has set for a few minutes. These are so great for dim lighting, and relaxation.
**SIDE NOTE** Try to find white tea lights if possible because the yellow ones, like I'm using, make the glitter's coloring look funky.
This project cost me like $4 to make a jar, it was super cheap and easy, and make sure you wear gloves
I am going to be posting some of my DIY stuff and just other fun things (some storebought) that I have used to spice up my room and bathroom. But, right now, I do not have a camera. I may use my iPhone camera, but I am saving up for a Canon Rebel, yayy<3
So if you do read these, thank you, and check this tab frequently for new projects!
|
 RSS Feed